THIS BLOG HAS MOVED!

Showing posts with label Urban Decay. Show all posts

Wednesday, August 20, 2014

Deep Purple + Black Smoky Eyes


What I'm wearing: 
Rimmel London Stay Matte Primer [003] 
Smashbox High Definition Concealer [fair] 
Physicians Formula Mineral Wear loose powder [translucent light] 
Physicians Formula multi-colored blush [Blushing Peach] 
Sephora eyeshadow [Peach Beige N*13] 
Revlon Luxurious Color eyeshadow [045 Black Galaxy] 
Urban Decay eyeshadow [Rockstar] 
Neutrogena MoistureShine Lip Soother gloss [Glimmer 15] 
e.l.f. Makeup Mist & Set spray [not pictured] 


I know, it's a lot. This is not a low-maintenance look. 

Wednesday, June 18, 2014

What's In My Makeup Bag: June 2014


What's in my bag: 
Sephora eyeshadow Peach Beige N*13 
Revlon Super Lustrous Lipstick 663 Va Va Violet 

Outfit: Your Ribs Are Showing 

I'm really loving dark purple eyes and lips right now, especially with my light blonde hair- it really balances out my look, with the dark clothes and light complexion.

I must admit I was afraid of dark lipstick in the past. But it's one of those things you just have to try for a while, and it grows on you. I am now a lover of bold lips and won't go anywhere without my lipstick!

Monday, May 5, 2014

What's In My Makeup Bag: May 2014


What's in my makeup bag: 
Studio Gear CC Cream in Linen [light] 
Rimmel Natural Bronzer 027 Sun Dance 
Rimmel Glam Eyes eyeshadow palette 027 Brick Lane 
Rimmel Moisture Renew lipstick 642 Nude Delight 

I've been drawn to shimmery nude palettes lately, since they're so quick and easy to apply- no need for precision -and with a light dusting of bronzer, really make your skin glow. Simple and effective. 

I go out walking/hiking a lot, and this is the time of year I switch to tinted moisturizers and CC creams with SPF. Nothing looks worse than heavy foundation on a hot, sunny day.. especially if it's the wrong color, which happens to all of us as we tan. Use a lighter formula, like a CC cream with SPF [20 or higher]. 

Sun protection is important! I started using Vitamin C serums recently, which provide additional protection [among a ton of other benefits]. [Note: Vitamin C serums are not a replacement for sunscreen.] Try to use makeup, and especially lip products, with SPF. If you dye your hair, you will want to use products to protect against fading. I make sure to spray my scalp [since my hair is short and braided] with sunblock before going out in harsh sunlight. Burnt scalp sucks! I learned that the hard way. 

Sunlight is good, but I strongly advise against tanning. It fades tattoos and makes you age quicker. 

Love your skin. <3

Wednesday, April 9, 2014

What's In My Makeup Bag: April 2014

Time flies by so quickly! We're already in the second week of April, and I still haven't shared what's in my everyday makeup bag this month! 


What's in my bag (in order of application): 
Rimmel Glam Eyes eyeshadow palette 027 Brick Lane 

I was never a fan of Rimmel London in the past, but after being a part of their #staymatte campaign and scoring a bunch of makeup goodies, I've noticed a huge change in product quality- the eyeshadows and liners in particular are amazing, and last all day! The Stay Matte Primer has become my all-time favorite foundation primer, and the Natural Bronzer adds a light, healthy glow to my super-fair skin- not at all orange-y, nor looks like dirt. Amazing! 

My biggest makeup concerns are natural-looking coverage and durability. I'm a Sephora addict, and when I find a drugstore product that works better than their professional counterparts, I'm ecstatic. A lot of the new drugstore products are amazing! As a frugal shopper and avid coupon clipper, this opens a lot of doors for me- I can look great, for super-cheap! 

Of course, this doesn't mean I've stopped shopping at Sephora- I still have my much-needed indulgences. A girl needs pampering, after all.. But I spend a lot less money now. 

Friday, February 21, 2014

Makeup: Black Mystery Smoky Eyes


Lately I've been wearing a basic soft black smoky eye (no eyeliner), and playing around with different sparkly loose pigments. My favorite right now is Maybelline Color Tattoo Pure Pigments in 30 Black Mystery. The blue sparkles are so cool! 

Today I skimped on my makeup routine (no primers or highlighters!), but I think it's good to take a break every now and then, and not obsess over the little things. 

What I'm wearing: 
Sephora eyeshadow N*13 Peach Beige 

Brushes: 


I applied the black shadow all over my eyelids, as well as underneath, with a damp makeup brush, to help it last longer and avoid the black powder falling onto my cheeks (which, the black on super-pale skin can make a terrible mess). I like to use a somewhat thick (but flat) brush for a more dramatic effect. Then I highlight my browbones, and underneath my eyes, with a nude shimmer shadow. I usually skip eyeliner these days because with dark eye makeup, a harsh line is a bit too much with light blonde hair, I think. 

FYI: 
Regardless of bad skin days or unflattering lighting, I will not retouch my photos here. (This, of course, does not apply when I work with other photographers, as those photos are products of their talents.) As a personal style/beauty blogger, I am exposing myself to you- I think you should see me as I really am. This isn't about vanity, it's about documenting my life. 

Tuesday, December 10, 2013

How To Cover Tattoos

Every day I see people with tattoos they want removed or covered up for various reasons (i.e. they hate the tattoo(s), need to cover them for work or can't get hired, etc.) and let's face it- laser removal does not make you look like you never had the tattoo in the first place, so be sure to do your research if you're considering such a thing.. and that wrecking balm people talk about doesn't work either. 

You can always cover a bad tattoo with another (better) tattoo, or MAKEUP. 

I chose to use Gary as my model for this cover-up project for a couple of reasons: 
1) He has tattoos on his face, the most noticeable, and taboo to some, of places to get tattooed. 
2) His facial tattoos are mostly in his beard area, which is a difficult place to do a flawless cover-up due to coarse hair (even freshly shaved). 

**Unfortunately the lighting varies in the before and after photos due to different times of the day.. 

BEFORE: Gary with tattoos
My biggest concern about this cover-up was getting that 100% coverage while looking as natural as possible. And my second biggest concern was I've never done this before!

As with covering anything, there are specific steps you need to take, like making sure to prime the skin, and when layering concealer, set with powder. As always, I also did a little improvising too...

Here's how I did it:

Step 1: Moisturize.
After washing your face, be sure to moisturize! Makeup never looks good on dry skin- you need a smooth, healthy canvas. I love YesTo Tomatoes Daily Balancing Moisturizer because it's natural, moisturizes very well, and also controls oil and breakouts.

Step 2: Prime.
This is another super important step that helps smooth your skin and keep your makeup in place longer. I use Smashbox Photo Finish foundation primer to prepare the skin for heavy makeup.

Step 3: Foundation (optional).
This one is up to you, and really depends on where the tattoo(s) is/are, and how natural (or not!) the look you're going for is. I used Tarte Smooth Operator tinted moisturizer to allow Gary's natural glow (of his non-tattooed skin) to show through, and create a more natural, 'no-makeup' appearance. If it was my face, I would have used CoverGirl Outlast 3-in-1 foundation for a more smooth, very feminine, porcelain look. Most likely, those reading this do not have facial tattoos and do not require foundation.

Step 4: Conceal.
This is the step everyone thinks of in regards to tattoo cover, and many forget the rest... This is the big step that you need to get right, but is also pointless if you ignore everything else on this list. (The concealer is nothing without staying power.) You will want a nice, creamy, long lasting, full coverage concealer. On Gary, I used Kat Von D Lock-It Tattoo Concealer. I also like Smashbox High Definition Concealer personally, and feel that could be a viable option. I dabbed it on with my fingers, and blended using the same motion. Some like to use a concealer brush, and that would be fine as well.

Step 5: Powder.
You will want to set the concealer with a dusting of powder. I used Sephora MicroSmooth Powder, as it is a staple in my makeup kit. But I tried a little of the Kat Von D Lock-It powder at Sephora the other day, and am very curious about what it can do. (Guess what I'm buying next shopping trip...) I am almost positive it will be a much better choice for tattoo cover.

Step 6: Repeat.
Repeat as necessary. If you have a lighter tattoo and it's covered to your liking, continue on. Otherwise, go back to Step 4.

Step 7: Powder again.
Yes, powder again. This time with a sponge, with a sort of dabbing technique. You want full coverage.

Step 8: Bronze and/or highlight.
Depending on how much space you have to cover, you will probably look dead, as Gary did once covered. I just dusted on Rimmel Natural Bronzer in 027 Sun Dance. Perfect! You may not have to do this.

Step 9: Set it.
Today I tried out the Make Up For Ever Mist & Fix I bought the other day. Not bad, but I still prefer Urban Decay De-Slick much more, and feel it will keep makeup in place much longer, and the mister nozzle is the best one I've used by far.

The outcome:
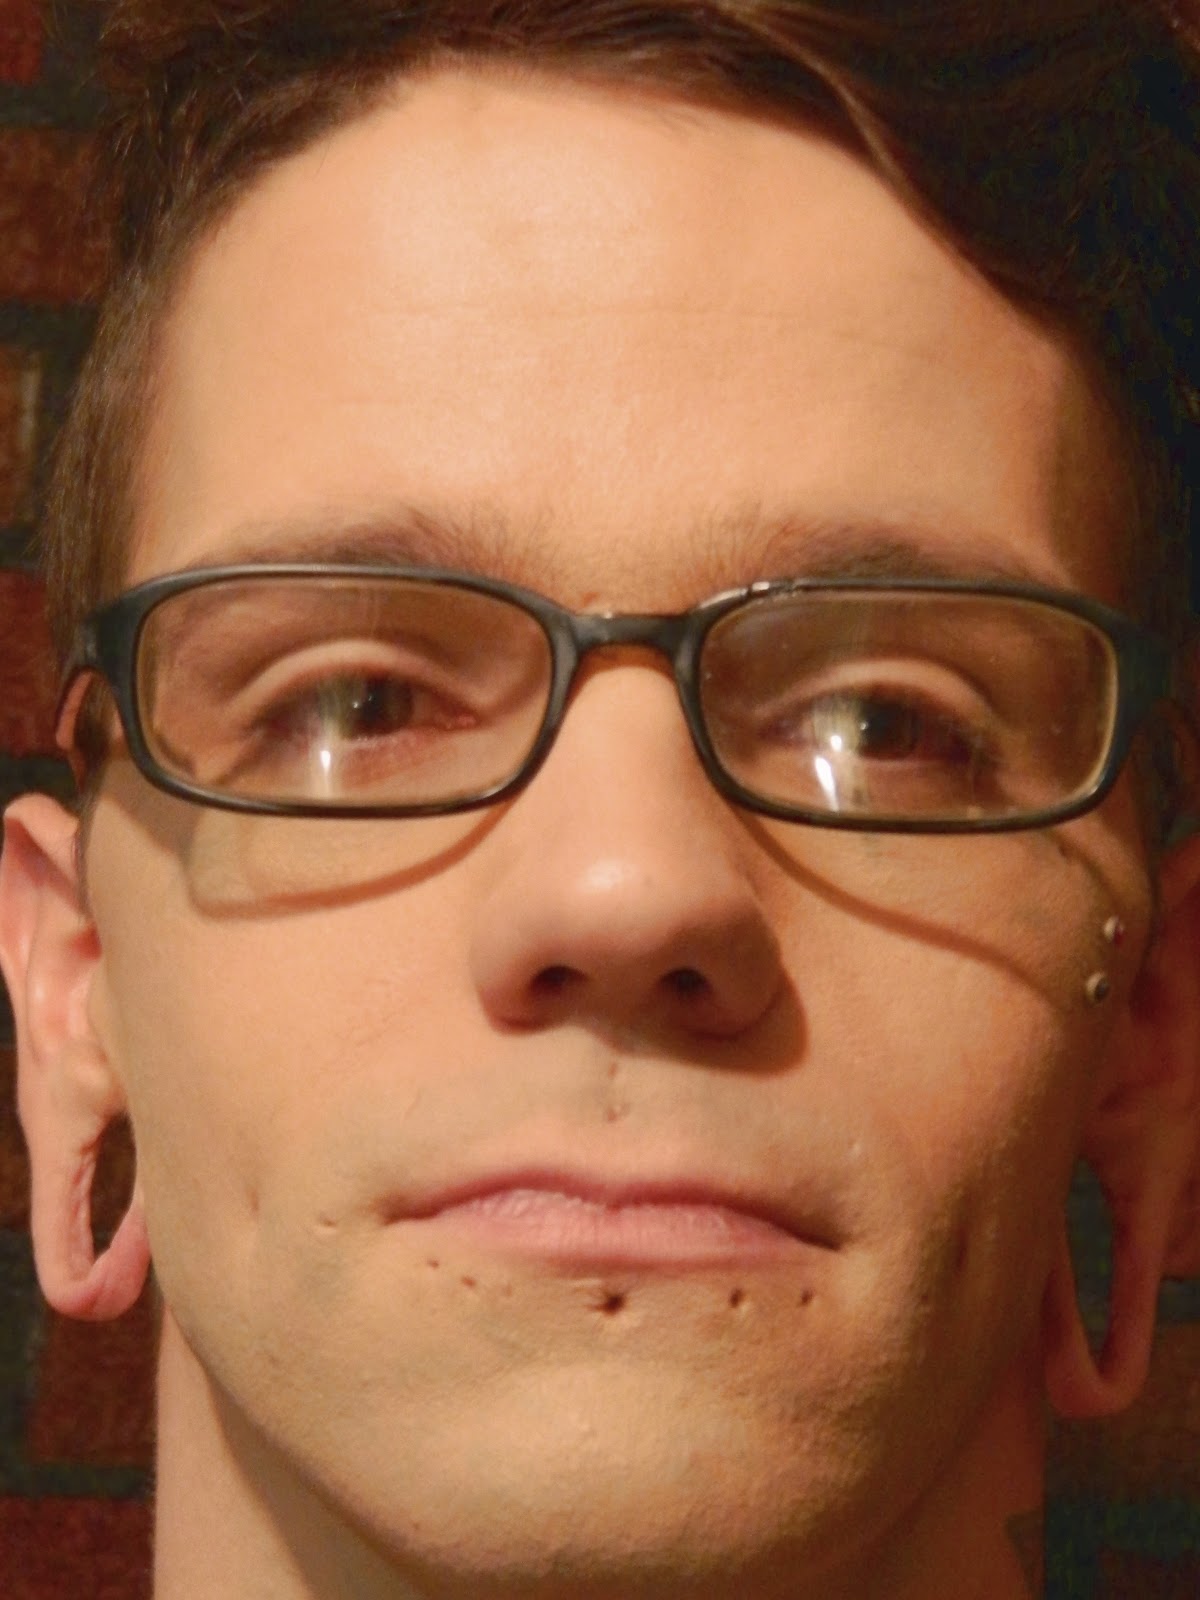
AFTER: Gary with no tattoos
Not bad for a first time tattoo cover with limited products, I think.

Gary was a little shocked seeing himself without tattoos for the first time in a long lime. I know I would be, too!

Do you have any tattoos you need to conceal? Have you tried, and what did you use?

Tuesday, November 26, 2013

Review: Urban Decay Anti-Aging Eyeshadow Primer Potion

I received a free sample of Urban Decay Anti-Aging Eyeshadow Primer Potion the other day while shopping at Sephora, and just couldn't wait to test it out. 

I wore it under Urban Decay eyeshadow in Rockstar, which seemed apt. 


Let me put my makeup problems into perspective for you- I have a very difficult time with eyeshadow. My eyelids happen to be one of the oilier spots on my face, and without any extra products, shadow creases and melts off within an hour or two. Every single time.

I never put much thought into the anti-aging thing, but I am approaching the big 3-0 after all (I'll be 28 next month!). That's almost over the hill by style/beauty blogger standards... Perhaps now is the time to begin my search for the fountain of youth. 

After 12 hours, my eyeshadow has long surpassed the mattifying power of my foundation, with no touch ups. I tried to smudge the barely noticeable crease back into place with my finger, but it didn't budge. This must have happened before the primer potion set, because this color is STUCK! Great stuff, just need to remember dry time..

The KVD makeup setting mist didn't even work this long. (That really disappoints me, BTW!)

I may have just found the answer to my eyeshadow creasing woes- Urban Decay Eyeshadow Primer Potion, I mean, MIRACLE POTION. That shadow isn't going anywhere. Like, ever.

The primer(s) you choose to wear beneath your makeup is/are super important, as they prepare the canvas to be painted, and help your look stay in place. Don't neglect yourself of proper priming!

Have you tried this product? What do you think about it?

Saturday, November 23, 2013

Frugal Life: New Beauty Loot!

*This post contains affiliate links.* 

I just got back from Sephora, with some cool new goodies! 

My purpose of going was to pick up more Smashbox Photo Finish foundation primer ($36), but then I saw Nails Inc. Special Effects nail polish in cheyne walk on clearance for $2, and I got a free trial size of Urban Decay Anti-Aging Eyeshadow Primer Potion! 

That's how I roll, yo. 


I have not yet tried the nail polish or the eye primer, but I've heard many good things, and can't wait to test them out! 

The Smashbox foundation primer is one of those tried-and-true items I just can't live without. It smooths my skin and makes my makeup stay put all day long. And it's super lightweight! Worth every damn penny, I tell you. 

Some of you may want to argue this post not worthy of  the frugal life tag, because I just spent thirty-six fucking dollars on foundation primer. Eat shit, okay? I saved $7.51 on the nail polish, and got the eye primer FREE. The price of pro quality doesn't get much better than this. 

Have you tried any of these products? What do you think of them? 

Sunday, October 27, 2013

Makeup: What I Wore To The Zombie Ball

*This post contains affiliate links.*

I'm so excited and I just can't hide it
Last night was the Zombie Ball, before which I did not have time to take outfit photos. But other people happened to snap some photos while we were there and I can at least talk about the makeup I wore.

I was super prepared as far as the makeup goes... I woke up this morning to find it hasn't budged one bit. Not a single crease. Spilling my drink down my chin didn't do anything to it. I tell you, these are miracle products right here.

To get that perfect pale complexion, I used...
CoverGirl Outlast 3-in-1 foundation
Sephora MicroSmooth powder

On my eyes, I used...
the matte black from Revlon Colorstay eye shadow quad in Siren (applied dry with a sponge applicator to line the eye, then with a brush to extend outward)
Make Up For Ever Smoky Extravagant mascara

To set the look, I used...
Urban Decay De-Slick makeup setting spray

black corset by Charlotte Russe, gifted from a friend

I passed out with my makeup on last night (bad, I know...) and even now, as I'm sitting in my robe with a hangover, I still look fabulous. In fact, I'm actually kind of dreading washing it off and finding out how bad my under eye circles really are...

So if you're going to an event, or just want to be sure your makeup stays 10+ hours, I really suggest trying these products out for yourself. You may be pleasantly surprised.


Thursday, October 3, 2013

In My Makeup Bag Right Now: October 2013

*This post contains affiliate links.* 

I've added a few new products to my bag since last month's post- check it out: 

YesTo Tomatoes daily balancing moisturizer, Urban Decay De-Slick makeup setting spray, Covergirl Outlast Stay Fabulous 3 in 1 foundation, Sephora MicroSmooth face powder, Kat Von D True Romance Eyeshadow in fever ray, Benefit They're Real! mascara, Neutrogena MoistureShine gloss in natural boost

YesTo Tomatoes daily balancing moisturizer
Urban Decay De-Slick makeup setting spray
Covergirl Outlast Stay Fabulous 3 in 1 foundation
Sephora MicroSmooth face powder
Kat Von D True Romance Eyeshadow in fever ray
Benefit They're Real! mascara
Neutrogena MoistureShine gloss in natural boost

I'm a big fan of the YesTo Tomatoes moisturizer. I bought it a week ago and immediately saw a great difference in my skin quality. It moisturizes, fights breakouts, and is neither thick nor oily. It gives my skin the amazing, healthy glow it has never had. I can't wait to see how it reacts with my dry winter skin over the coming months...

I forgot I had this lip gloss in my collection, so it was amazing to rediscover it. I used to use the Neutrogena MoistureShine gloss in whisper for years, then eventually decided to try natural boost as well. Now that I've gone back to my natural hair color, I think this gloss looks better on me. The staying power is a definite plus as well. I absolutely love it!

Have you tried any of these products? What do you think?

Tuesday, September 17, 2013

Makeup: Winged Eye #1

*This post contains affiliate links.*

This is the first of many makeup photo posts here on my blog - Winged Eye #1.

This was a very simple and quick look to create, and probably the least dramatic of the winged eye looks I'll show you. I applied a line of bronze eyeshadow along my top lids, and extended from the outer corners, toward my temples. Then I brushed on a little shimmery nude shadow along my brow bone, as well as along the bottom of my eyes. A little extra in the inside corners helps brighten up my tired eyes. (Can you tell I didn't sleep well last night?) Then I lined my bottom lids with a purple glitter eye pencil and swiped on a layer of mascara to finish it off.

What I used:
1) Smashbox foundation primer
2) Smashbox high definition foundation
3) Sephora MicroSmooth face powder
4) Sephora Black Magic eye palette
5) Sephora 12HR eyeliner in Tango Night
6) Make Up For Ever Smoky Extravagant mascara
7) Urban Decay De-Slick makeup setting spray

A good set of makeup brushes is really important if you want to play around with different looks. They don't have to be super fancy and expensive either - I use e.l.f. brushes - you just need some quality tools to work with.

And don't despair if it doesn't turn out right the first time- sometimes it just takes a little practice.


Tuesday, August 20, 2013

Review: Urban Decay De-Slick Makeup Setting Spray

*This post contains affiliate links.*

I recently bought the Urban Decay De-Slick Makeup Setting Spray and have to say this is the best product I've used so far to combat oil and my makeup sliding off.

My midday oil problem has met its match- this stuff really does make it stick, there is no makeup sliding off my face anymore! No eye makeup creasing, nothing!

This setting spray not only controls oil, but also seems to cool down my makeup (a similar and longer lasting technique like putting your face in the freezer for a short time).

Not once did I have to blot my face all day at work, and it was around dinner time that I finally started noticeably producing oil. This is really good for me, especially in August! I can't wait to try this stuff in the winter.

It is well worth the $29, and I will most definitely buy it again. This is now a permanent staple in my makeup bag.

Rating: 9.5/10

Related Posts Plugin for WordPress, Blogger...